Let’s take a look at what are our options to remove the toolbar in macOS. Despite many new APIs introduced in WWDC 2024, it turned out to be rather tricky.
The problem 🤔
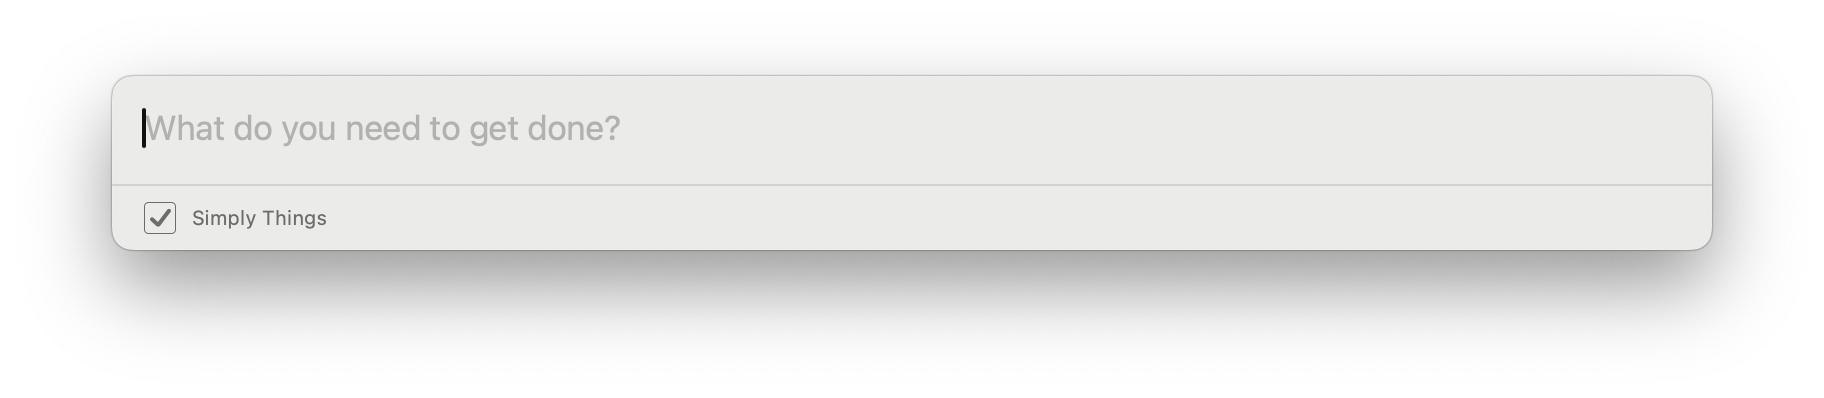
For my Todo list app “Simply Things” that I am currently building I wanted to have a Spotlight-like hotkey window that I could trigger with a keyboard shortcut anywhere to add a new Thing to do that looks like this:
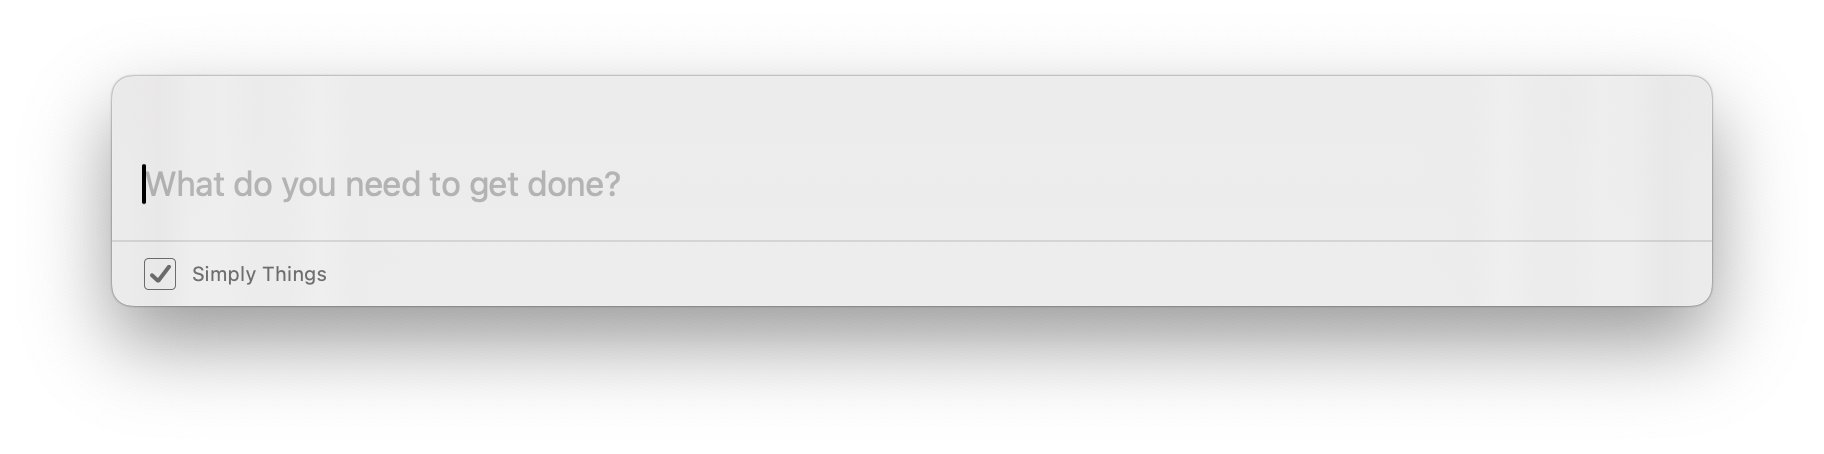
 Starting with macOS 15.0 (WWDC24: Tailor macOS windows with SwiftUI) we can easily hide the toolbar for macOS windows:
.toolbarVisibility(.hidden, for: .windowToolbar)
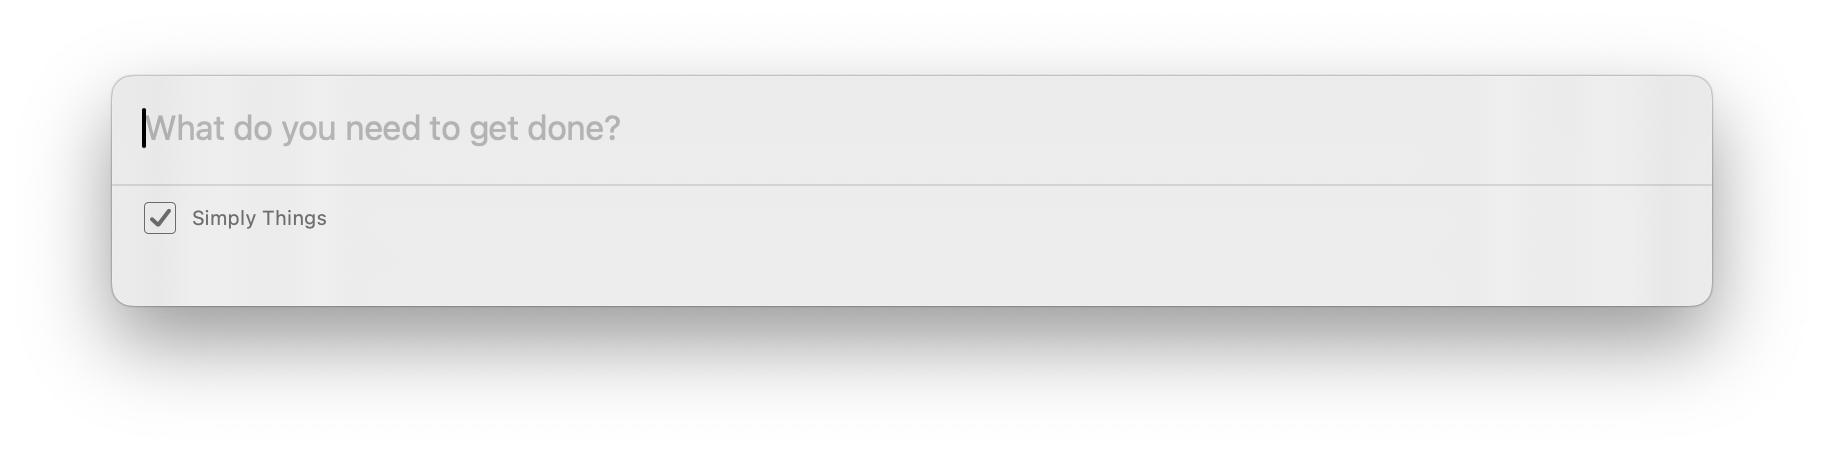
But what I got as a result was this:
 So I thought I would just need to apply
 .ignoresSafeArea() and my problem would be solved, but that only pushed the content behind the now invisible toolbar background, leaving a padding on the bottom that I couldn’t get rid of:
The solution 💡
It’s not a perfect one, but we need to go back to AppKit. No matter what I have tried in SwiftUI, it doesn’t seem like there is a sensible way to ignore the window toolbar’s safe area completely. In order to work around this, first I have created a subclass of NSHostingView that ignores the Safe Area. Unfortunately without doing this adding even a negative padding to the view would not successfuly make the content go underneath the title bar without creating a space at the bottom.
final class NSHostingViewIgnoringSafeArea<T: View>: NSHostingView<T> {
    required init(rootView: T) {
        super.init(rootView: rootView)

        addLayoutGuide(layoutGuide)

        // Pinning the view to the edges
        NSLayoutConstraint.activate([
            leadingAnchor.constraint(equalTo: layoutGuide.leadingAnchor),
            topAnchor.constraint(equalTo: layoutGuide.topAnchor),
            trailingAnchor.constraint(equalTo: layoutGuide.trailingAnchor),
            bottomAnchor.constraint(equalTo: layoutGuide.bottomAnchor)
        ])
    }

    override func viewDidMoveToWindow() {
        // We need to set the alpha value to 0 here, since
        // before the title bar computation is done, the view might jump.
        // We will be setting the alpha back to 1 after computation is finished.
        window?.alphaValue = 0
        super.viewDidMoveToWindow()
    }

    private lazy var layoutGuide: NSLayoutGuide = NSLayoutGuide()

    required init?(coder: NSCoder) {
        fatalError("init(coder:) has not been implemented")
    }

    override var safeAreaRect: NSRect { frame }

    override var safeAreaInsets: NSEdgeInsets {
        NSEdgeInsets(top: 0, left: 0, bottom: 0, right: 0)
    }

    override var safeAreaLayoutGuide: NSLayoutGuide { layoutGuide }

    override var additionalSafeAreaInsets: NSEdgeInsets {
        get { NSEdgeInsets(top: 0, left: 0, bottom: 0, right: 0) }

        set {}
    }
}
Once we have this in place, we need to be able to calculate the title bar’s height. Coming from iOS we might want to just get the Key Window of the NSApplication, compute the title bar height and apply negative padding, but with macOS we might not have a NSWindow at all for our app while trying to compute the height, so it’s not very reliable.
For reliability we should create a NSViewRepresentable that will grab its NSWindow and calculate the title bar height. Let’s also not forget to set the alpha back to 1 for the window.
struct WindowHiddenToolbarView<Content: View>: NSViewRepresentable {

    init(
        contentTopPadding: Binding<CGFloat>,
        content: @escaping () -> Content
    ) {
        _contentTopPadding = contentTopPadding
        self.content = content
    }

    @Binding private var contentTopPadding: CGFloat
    private let content: () -> Content

    func makeNSView(context: Context) -> NSView {
        let view = NSHostingViewIgnoringSafeArea(
            rootView: content()
        )

        DispatchQueue.main.async {
            if let window = view.window {
                let windowFrameHeight = window.frame.height
                let contentLayoutFrameHeight = window.contentLayoutRect.height
                let titlebarHeight = windowFrameHeight - contentLayoutFrameHeight
                contentTopPadding = -titlebarHeight

                // We need to make sure to set alpha back to 1, since we are setting
                // it to 0 in NSHostingViewSuppressingSafeArea
                window.alphaValue = 1
            }
        }

        return view
    }

    func updateNSView(_ nsView: NSViewType, context: Context) {}
}
Using our newly created WindowHiddenToolbarView will do the job already, but we would need to keep a @State in our view and apply the negative padding, but here comes a ViewModifier to our rescue 🎉!
struct WindowHiddenToolbarModifier: ViewModifier {

    @State
    private var contentTopPadding: CGFloat = 0

    func body(content: Content) -> some View {
        WindowHiddenToolbarView(
            contentTopPadding: $contentTopPadding,
            content: { content }
        )
        .toolbarVisibility(.hidden, for: .windowToolbar)
        .padding(.top, contentTopPadding)
    }
}

extension View {

    func windowToolbarHidden() -> some View {
        modifier(WindowHiddenToolbarModifier())
    }
}
This neat modifier allows us to be able to hide the toolbar just like that
TheView()
    .windowToolbarHidden()
And voila! We have a SwiftUI view that hides the toolbar and completely ignores the Safe Area!
Targeting older macOS Versions
If you need to target older macOS versions and cannot use the .toolbarVisibility(.hidden, for: .windowToolbar) modifier, inside of WindowHiddenToolbarView you can change the makeNSView method like so:
    func makeNSView(context: Context) -> NSView {
        let view = NSHostingViewIgnoringSafeArea(
            rootView: content()
        )

        DispatchQueue.main.async {
            if let window = view.window {
                let windowFrameHeight = window.frame.height
                let contentLayoutFrameHeight = window.contentLayoutRect.height
                let titlebarHeight = windowFrameHeight - contentLayoutFrameHeight
                contentTopPadding = -titlebarHeight

                // This makes sure we hide the title bar as well as the buttons
                window.titlebarAppearsTransparent = true
                window.titleVisibility = .hidden
                window.styleMask.insert(.borderless)
                window.styleMask.remove(.closable)
                window.styleMask.remove(.fullScreen)
                window.styleMask.remove(.miniaturizable)

                // We need to make sure to set alpha back to 1, since we are setting
                // it to 0 in NSHostingViewSuppressingSafeArea
                window.alphaValue = 1
            }
        }

        return view
    }
Final Thoughts 🔚
While this solution is far from perfect, this seems like the only sensible way to achieve this but perhaps I am missing something 🧐. I will be very glad for any suggestions on how to achieve the same result, since I would be happy to remove this boilerplate in my own project myself 😅!
Coming Next 🔜
In next article we will take a look at how to create a Spotlight-like hotkey window, stay tuned!